Androfreeze

Wellcome to Androfreeze

Android Freeze is a blog that provides information about the android tutorial, troubleshooting, tools, root, app and social messenger tips

STARTJOIN

Minggu, 02 Oktober 2016

Download MTK USB Drivers


Download MTK USB Drivers

Download MTK USB Drivers


Features of MTK USB All Drivers

IMEI Flashing

Many times MTK VCOM or CDC Driver failed to detect the device while writing the IMEI using the SN write tool, in that case MTK USB all driver can helps yotu device to get detected by your computer.

Flashing Firmware

If your device is having a bootloop or not turning on, and you want to flash the stock firmware to fix the bootloop then in that case MTK USB all driver allows you to connected by your computer

General Connecting the Device

It Allows you to connect your MEDIATEK Device to computer and trabsfer data between the device and computer ( make sure you have enable USB debugging on your device before connecting the device to computer )

Download MTK USB Drivers ( All Version )

No USB Driver Link
1 MTK USB Driver V0.8.0 Download
2 MTK USB Driver V0.8.2 Download
3 MTK USB Driver V0.8.4 Download
4 MTK USB Driver V0.9.0 Download
5 MTK USB Driver V0.9.2 Download
6 MTK USB Driver V0.9.7 Download
7 MTK USB Driver V1.0.1 Download

Sabtu, 01 Oktober 2016

Download Xiaomi USB Driver for Windows – Redmi and Mi Phones

Download Xiaomi USB Driver for Windows – Redmi and Mi Phones

Download Xiaomi USB Driver for Windows – Redmi and Mi Phones

No DRIVER LINKS
1 Xiaomi Mi5 (Pro) DOWNLOAD
2 Xiaomi Mi4 DOWNLOAD
3 Xiaomi Mi3 DOWNLOAD
4 Xiaomi Mi Note DOWNLOAD
5 Xiaomi Mi Note ( Pro ) DOWNLOAD
6 Xiaomi Mi 4i DOWNLOAD
7 Xiaomi Redmi 1S DOWNLOAD
8 Xiaomi Redmi Note 4G DOWNLOAD
9 Xiaomi Redmi 2/Prime DOWNLOAD
10 Xiaomi Redmi Note DOWNLOAD
11 Xiaomi Mi Pad 7.9 DOWNLOAD
12 Xiaomi Mi4 LTE DOWNLOAD
13 Xiaomi Mi4C DOWNLOAD
14 Xiaomi Redmi Note 3 Pro DOWNLOAD
15 Xiaomi Redmi Note 2 DOWNLOAD
16 Xiaomi Redmi Note 2 Prime DOWNLOAD
17 Xiaomi Mi Pad 2 DOWNLOAD
18 Xiaomi Redmi Note Prime DOWNLOAD
19 Xiaomi Redmi 3 / Pro DOWNLOAD
20 Xiaomi Mi4S DOWNLOAD
21 Xiaomi Redmi 3S / Prime
DOWNLOAD
22 Xiaomi Mi Max DOWNLOAD
23 Xiaomi Redmi 3X DOWNLOAD
24 Xiaomi Mi5S / Plus DOWNLOAD
25 Xiaomi Redmi Note 4 DOWNLOAD
26 Xiaomi DOWNLOAD
27 Xiaomi DOWNLOAD


Download Font Awesome set for Asus Zenfone


Download Font Awesome set for Asus Zenfone

Download Font Awesome set for Asus Zenfone

Asus Zenfone Series is one of the many outstanding Android devices here. This series is also able to make ASUS ranked first sales in Indonesia in 2015 to shift the Samsung based on data from IDC.

The number of users Zenfone, of course you are also one of them here. In addition to having a reliable specification at a reasonable price. Asus also has a distinctive look that is commonly referred to ZenUI.

In ZenUI, you can customize the look of the icons begin to wallpaper. Well, for those who like to change the look and want to give a new look at the Asus Zenfone it can be to install the APK to set the font / extra letters.

Download Font Awesome set for Asus Zenfone

Interestingly, to install the font collection of this interesting device you do not have the root condition. Enough with the APK install as usual and then to device settings >> display >> Font Style >> Select the desired font.

There is an interesting collection of fonts that can be tried. This APK named PowerFlip Font obtained from XDA Developers forum has been tested and runs well on the Asus Zenfone 2, Zenfone 4 and 5. For other series may not have any problems or yah would arguably be as well. You can try it yourself.

For more, you can download it via the link below. If it can, do not forget to comment in the comments field. Good luck.


Troubleshooting Error in Google Play Store Android


Troubleshooting Error in Google Play Store Android

Troubleshooting Error in Google Play Store Android

Google Play Store is the core application for how to download other applications in Android. Market applications and entertainment content is at the heart of Android. Without it, you will find it hard to easily install applications on Android.

However, despite the Google Play Store has made an application system that can not be uninstalled. Not that this application was natural without any problems. Some problems in the Google Play Store is certainly already have it. As can not download the application, the error code messages, Google Play Store always stops (stop force), it can not connect and more.

How do I resolve the error in the Google Play Store? Here are the steps that you can do.

1. Restart your Android device

This method is the first way if you have a problem with Google Play Store Android. Sometimes problems in the Google Play Store could easily this way.

2. Check The Date and Time

Do you know if it turns out problems on Google Play strore because of the time and date on your Android device does not fit? Because of these problems, then access to the Google server will be different. So to sync to the server problem. Do check the date and time on device settings, select the automatic settings mode Agara appropriate date and time.

3. Forced Stop (Stop Force)

Force Stop application is an easy way to stop the activities run on the application. If there are errors in the Google Play Store just like any other application can also be done this way. The way the check in settings> manage apps> select all apps> find the Google Play Store> click on the app> select FORCE STOP. Also make sure the Google Play Store Android has been removed from the list of recent app.

4. Clear Cache and Data Applications Google Play Store

This method is the next step if the three steps above have not been able to solve the problems in the Google Play Store. By removing the cache and the data in the Google Play Store will give a fillip to the application is the same as when the Google Play Store installed. To clear the cache and the data in the Google Play Store caranya similar as step number three, then select clear cache and clear data.

5. Uninstall the Google Play Store Update.

Android is Google Play Store app on Android system. So it can not be deleted on your device unless the device has root access. Problems in the Google Play Store also sometimes of the software. To provide the software solution can also be done UNINSTALL UPDATE. And let Google Play Store update the latest version automatically.

6. Delete Google Account

Delete and re-add a Google account can fix the problem in the Google Play Store. How to? To your Android device Settings> Accounts Select the subtitles Personal> Now tap on a section of your Google Account currently in use> Tap the three dots in the upper right corner of the screen> select Remove from the Account menu> on the pop-up menu select Remove Account.

Now add back the Google account you use. Furthermore, re-open the Google Play Store. Should have returned to normal.

7. Check the APN settings

APN proxy settings usually causes not want to download apps on Google Play Store. All you need do is vacate the proxy settings. If it has been emptied, airplane mode and turn off airplane mode devices allow the network operator to start over. Supposedly you can download normally.

8. Provide free space on Internal Storage

Internal storage is used to download data applications / games (if necessary). Providing space on the internal storage can prevent failed download on the Google Play Store. Free capacity recommended is 10% of internal storage owned. Bigger is better, to make available space for the exchange of data and cache.

9. Update Google Play Services

Daria Google applications will not be able to function if there is no Google Play Services including Google Play Store. Although it is large enough, usually problems in the Google Play Store also to update the latest version of Goole Play Services. Google Play Services Updates will indeed be updated automatically. If not the latest version, you can manually install the Google Play Services. APK Download GooglePlay Services

10. Perform Factory Reset (Reset kebawaan Factory)

This step is the last step if it is still misbehaving in Google Play Store. By doing a factory reset, your device software will be normal at the time of initial purchase. With the conditions you never change the system like uninstalling the application system (device with root access). If you have modified the system on their devices and experience an error in the Google Play Store, it is recommended to flash the firmware.

May be useful..

How to Root and TWRP Recovery Samsung Galaxy Grand Prime


How to Root and TWRP Recovery Samsung Galaxy Grand Prime


How to Root and TWRP Recovery Samsung Galaxy Grand Prime

Samsung Galaxy Grand Prime is one of the smartphones that are quite popular with attractive budget. Recent yesterday Smartphone is getting an update to Android Lollipop firmware 5.0.2 using the Russian state. Although the firmware is derived from the Russian state, but it can still be used for other countries. And can run well.

For those of you who have to update it and wanted to do a root, can do flashing TWRP Recovery advance through ODIN application on the PC. After the update the zip file with flashing SuperSU. If you're curious to immediately take root and TWRP Recovery Samsung Galaxy Grand Prime following steps:

Preparation :

>> Make sure you back up important data (contacts, SMS, and other) funds backup Internal Data Storage to a PC.
>> Make sure the Samsung USB drivers are installed on the PC.
>> Make sure the battery is above 60%.
>> Just for Samsung Galaxy Grand Prime SM-G530H with Android 5.0.2 Lollipop. If still Android Kitkat, should be upgraded first.

Download File:

1. Download and Install Samsung USB Driver.
2. Download Odin3 v3.10.7. Then Extract.
3. Download TWRP Recovery for the Samsung Galaxy Grand Prime
4. Download SuperSU for Samsung Galaxy Grand Prime. Copy to internal / micro SD.

Installation:

>> Turn off / turn off the smartphone.
>> Start the ODIN application.
>> Do Downloading Mode in Samsung Galaxy Grand Prime by holding down the Home button for a few seconds + Volume Down + Power.
>> There will be a written warning, select the volume up to continue into Downloading Mode.
>> Samsung Grand Prime Connect to a computer via a data cable.
>> In ODIN will look œAddedâ € â € œ. The sign is already recognized in the PC, if there is no check back driver.
>> Next, click the PDA / AP in Odin.
>> Select TWRP-SMG530H.tar file you downloaded earlier.
>> Be sure to re-partion and Auto Reboot unchecked and the setting of the others are not changed.
>> Click on the start button to start flashing.
>> Wait until at ODIN Bismol œPASSâ â € € ??.
>> Now Galaxy Grand Prime own TWRP Recovery. Unplug your data. Then go into TWRP Recovery by way of Press Volume Up + Home + Power simultaneously.
>> Select Install TWRP Recovery on and navigate to the file SM-G530H-SuperSU-v2.46.zip.
>> Select the file, then slide to install the files.
>> If already installed, now select reboot to the system.

Congratulations, now Samsung Galaxy Grand Prime already diroot and have TWRP Recovery. If you own constraints, you can ask dikolom comment. Good luck.

Download ASUS Flash Tool 1.0.0.14 + 1.0.0.17


Download ASUS Flash Tool 1.0.0.14 + 1.0.0.17

Download ASUS Flash Tool 1.0.0.14 + 1.0.0.17

ASUS Flash Tool is a software in Windows to help mem-flashing the ROM (image with RAW format files) to multiple devices ASUS. Sotfware can be used for devices that experience softbrick, fails to boot, bootloop and others.

Using the ASUS Flash Tool can also to refresh ROM for users custom ROM and want to return to the stock ROM ASUS.

Download ASUS Flash Tool 1.0.0.14 + 1.0.0.17


The following device models are supported Asus ASUS Flash Tool:
    Asus Zenfone 4 A400CG
    Asus Zenfone 5 A500CG
    Asus Zenfone 6 A600CG
    Asus PadFone mini A11
    PadFone E (A68M)
    A91 PadFone X
    A450CG ZenFone 4
    A501CG ZenFone 5
    A502CG Zenfone 5 Lite
    A500KL Zenfone 5
    A601CG Zenfone 6
    FE170CG
    FE171CG
    FE171MG
    FE375CG
    FE375CXG
    FE375CL
    FE380CG
    FE380CXG
    ME70C
    ME70CX
    ME103K
    ME170C
    ME171C
    ME175CG
    ME176C
    ME176CE
    ME176CX
    ME181C
    ME181CX
    ME372CG
    ME372CL
    ME375CL
    ME560CG
    ME572C
    ME572CL
    ME581C
    ME581CL
    ME7530CL
    PF400CG
    PF400CL
    PF451CL
    PF500KL
    TF103C
    TF103CE
    TF103CG
    TF303CL
    TF303K
    Z170C
    Z170CG
    Z370C
    Z370CG
    Z580C
    Z580CA
    Z451CG
    ZE500CL
    ZE500KG
    ZE500KL
    ZE550ML
    ZE551ML

In version 1.0.0.17 added models of the device:

    ME560CG
    PF400CG
    U500
    Z300C
    Z300CG
    Z300CL
    Z380C
    Z280CX
    Z380KL
    ZE550KL
    ZD551CL


This application is an executable file, which you have to install it manually on Windows operating systems. These applications also include driver ASUS. To use them simply click on the file AsusFlashFileInstaller.exe, wait until the installation process is complete.

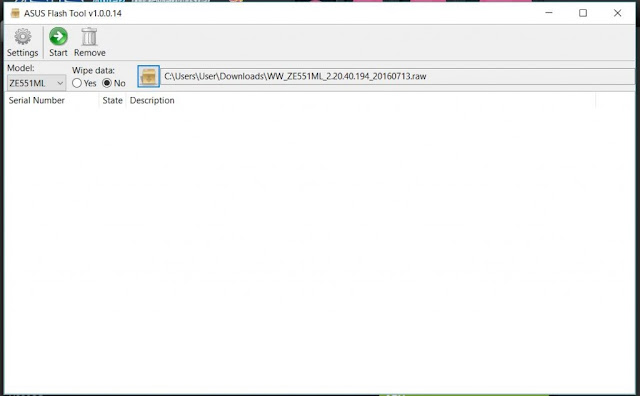
If completed open the software, select the device model> browse RAW files from the device model> select Wipe Data option Yes / no> Click the Start button to begin flashing. Good luck!

Troubleshooting Softbrick and Update Asus Zenfone 2 (ZE551ML) to Android Marshmallow


Troubleshooting Softbrick and Update Asus Zenfone 2 (ZE551ML) to Android Marshmallow

Troubleshooting Softbrick and Update Asus Zenfone 2 (ZE551ML) to Android Marshmallow

Still warm the last few weeks, finally Asus Zenfone 2 is getting an update to Android 6.0.1 Marshmallow. Update to the latest Android did make some changes and there are new features. In this article there will be a tutorial how to update to Android Asus Zenfone 2 official Marshmallow from ASUS. So no need to worry, because it is stable and minimal bugs. In this article will help you overcome fails to boot, softbrick and how to update to the official ROM for those who are already using a custom ROM like CM13 in its Asus Zenfone 2.

Preparation :

1. Make sure the battery is above 70%
2. Backup internal data storage, SMS and make sure it is in sync with your Google account.
5. Download Official Android Marshmallow ASUS firmware version 6.0.1 ASUS 4.21.40.134 through the Official website or through the mirror this link (Google Drive). File name: UL-Z00A-WW-4.21.40.134-user.zip. Size: 1.2 GB.
6. Download ASUS Driver (optional)

Troubleshooting Tutorial Softbrick and Update Asus Zenfone 2 (ZE551ML)

If you are on the custom ROM like CM13 or experiencing bootloop / her softbrick Asus Zenfone 2, can follow the steps below:

1. Install ASUS Flash Tool on your Windows PC. In the application is also already available drivers. Install the driver. If you are having problems can use ASUS or ADB Driver Installer.
2. Open the ASUS Flash Tool.
3. Connect Asus Zenfone 2 via a data cable to the PC.
4. Select the mode MTP (Media Transfer File) then Allow USB Debugging PC on Asus Zenfone 2. For those not enable USB debugging on the Developers Option. How to click Settings> About> Software Information> Tap repeatedly on the Build number.
5. Flash Tool will be detected ASUS USB connection with the USB icon colored green. If not detected, check back to drivers.
6. Furthermore, on the models, change to ZE551ML.
7. On the Options Wide Data, if Yes will erase all data including the internal storage. If you select No, it does not delete the data included Internal Storage. If the data comes Operekers custom ROM like CM13 and the like is strongly recommended Data Wipe select the option "Yes". Ensure internal storage already terbackup!
8. Next click the brown cardboard logo, click the logo and select the firmware file that you have downloaded RAW format. filename: WW_Z551ML_2.20.40.194.20160713.raw
9. Click the Start button to start
10. Wait until the process is complete and do not unplug the data if the process is still running!

Troubleshooting Softbrick and Update Asus Zenfone 2 (ZE551ML) to Android Marshmallow

For the experienced softbrick / bootloop and can not enter the homescreen. For ASUS flashing RAW files in Flash Tool can go into fastboot mode. The way the power off Asus Zenfone 2. Wait for a while until the device has actually been powered off. Press the Power button and Volume UP, if it vibrates and into the ASUS logo off the power button just press Volume UP button. Once entered into the fastboot mode, follow the steps above flashing.


Asus Zenfone Update to Android 6.0.1 Marshmallow

If you are finished flashing to the last version of Android Lollipop 2.20.40.194, the next step is to update to Android Marshmallow ASUS official version 4.21.40.134 Here are the steps:


1. Make sure the battery is above 70%
2 If you downloaded through the Google Drive Rename the file UL_Z00A_WW_4_21_40_134_user.zip be UL-Z00A-WW-4.21.40.134-user.zip. For a download from the official website of ASUS does not need to change the name.
3 Connect ASUS via a data cable to the PC.
4 Copy the firmware file to Internal Storage
5 Remove the data cable at the Asus Zenfone 2.
6 The device will find renewal system updates are available.
7 If you have not found an update, restart the device.
8 Select the update package UL-Z00A-WW-4.21.40.134-user, and then click OK
9 Asus Zenfone 2 will restart and perform the update, wait until the update process is complete.
10 The update will take a long time, about 20 minutes late. Be patient.
11 If the update process is completed will go to the homescreen. Happy now Asus Zenfone 2 you can enjoy Android 6.0.1 Marshmallow.

Troubleshooting Softbrick and Update Asus Zenfone 2 (ZE551ML) to Android Marshmallow